Catalogue
- Product introduction
- Product photo show
- Indicator light introduction
- Keys introduction
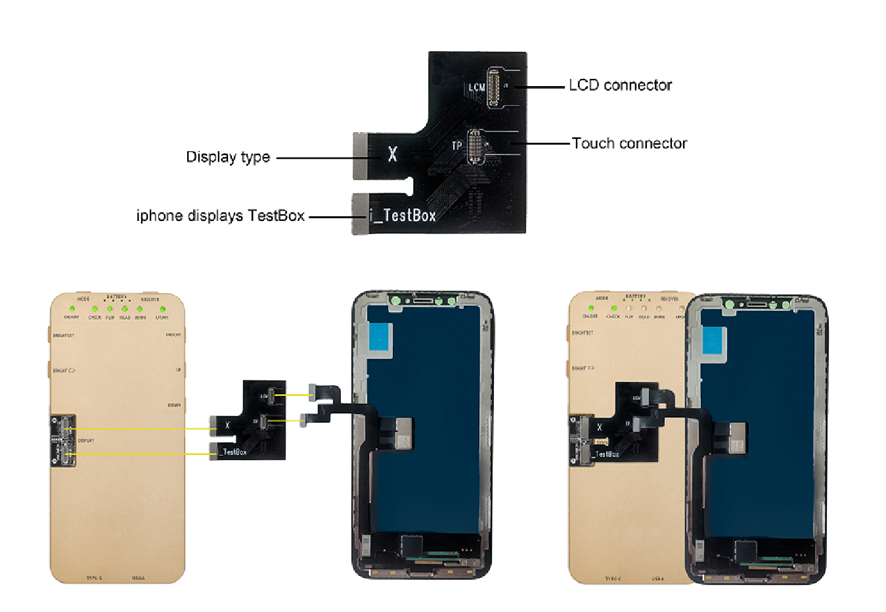
- Display connected to iTestBox introduction
- Charge introduction
- iTestBox on and off operation
- Display show function test
- Display touch and 3D touch functions test
- Display cover lets display on or off function test
- Recover funcitons of original color show and display brightness adjustment according to environment lightness
- Read the cover code using software named “沙漏助手”
- iTestBox system software update
- Product parameters and packing list
- Warranty regulations
- About us
Product introduction
1.1、highlight product features
Accurate and comprehensive test, small and beautiful appearance, professional and stable system, friendly user experience, lasting battery, convenient system software updation, professional after-sales
1.2、product main functions
1. One iTestBox for multiple type displays: support iPhone 12ProMax, 12Pro, 12, 12mini, 11ProMax, 11Pro, 11, XsMax, XS, XR, X, 8Plus, 8, 7Plus, 7, 6S Plus, 6S, 6Plus and 6 displays; support original and copied displays
2. Display show function test: show multiple photos(system pre-installed common photos and user loaded four photos) for accurate and comprehensive display test, user can config the photos easily
3. Display touch function test: automatic check hardware; simple and touch track show modes; user configs backgound
4. 3D Touch function test:pressure test of any display position for XsMax, XS, X, 8Plus, 8, 7Plus, 7, 6SP, 6S displays
5. Display brightness adjustment: user adjusts the display brightness using keys
6. Display cover lets display on or off function test: apple provides protect shell with cover, when cover closed or opened the display will be off or on, the iTestBox tests whether the display has this function(only iPhone X display has this function).
7. Recover funcitons of original color show and display brightness adjustment according to environment lightness
8. Multiple IOS versions for display test: support up to 8 IOS versions, test the display compatibility using different IOS
9. system software update conveniently: get latest software from officail website and update easily
10. powerful battery: support more than 4 hours usage and fast chage
Product Photo Show
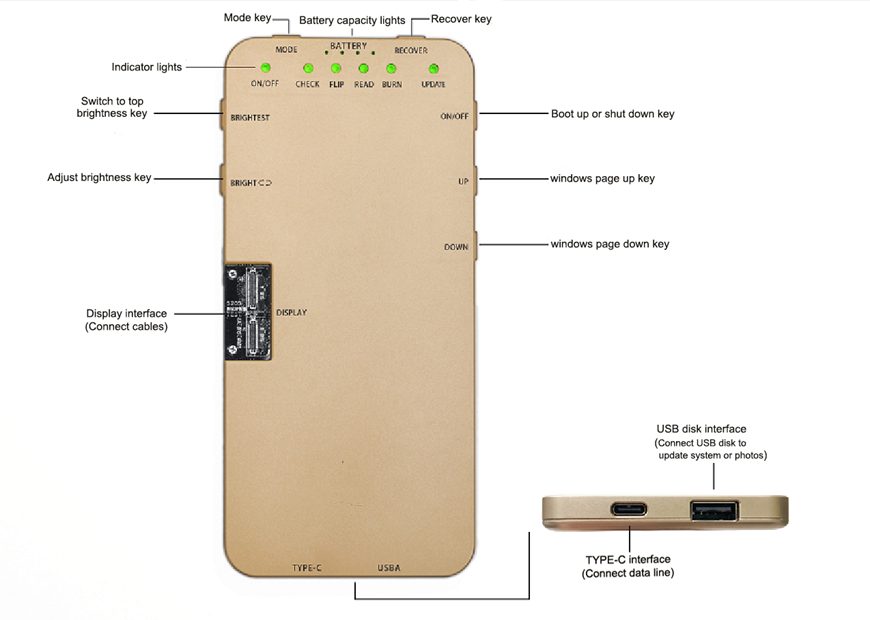
Indicator lights introduction
Battery light(baterry capacity after system on)
Total 4 lights, the numer of lights used for capacity; flashing lights: charging; red light: low battery; off light: system off
ON/OFF light(used at system booting up process)
Green flashing light: booting up; red light: system error; off light: display off state
ON/OFF light(used after system boot up)
Green light: display on at standard speed mode; yellow light: diaplay on at low speed mode; red light: display error; off light: display off state
Self check light
Green flashing light: touch self checking; always green light: touch self check passed; red light: touch self check error; yellow light: touch self check passed but no origin color show; off light: display off state
Cover flip light
Green light: display cover lets display on or off function work fine(only for iPhone X)
Read light(used for origin color recovery function)
Green flashing light: reading; always green light: read done; red light on: read failed; off light: display off state
Burn light(used for origin color recovery function)
Green flashing light: burning; always green light: burn done; red light: burn failed; off light: display off state
Update light
Yellow light always on or flashing: updating; always green light: update done; red light on: update failed
Buttons introduction
ON/OFF KEY
Long press for system on or off operation; click for display on or off operation after boot up
UP KEY
Click for photo paged up and long press for enabling all photos showed function
DOWN KEY
Click for photo paged down and long press for enabling current photo not showed function
BRIGHTEST KEY
Click for top brightness state; long press at touch function test state for switching to brightest background
BRIGHT KEY
Click for loop switching birghtness; long press at touch function test state for loop switching background
MODE KEY
Touch test state: click for switching IOS version, long press for switching simple mode and touch track mode; display show test state: long press for switching standard and low speed data show mode, low speed mode for some copied displays when they can’t show photos correctly at standard speed mode
RECOVER KEY
Touch test state: click for clearing touch track; display off state: long press used to read origin color data from display(green READ light means read done), click used to burn origin color data to display(green flashing light means buring, always green light means burn done, red light means read failed)
ON/OFF+BRIGHT KEYS
Two keys long pressed at the same time let system enter into system update process
ON/OFF+DOWN KEYS
Two keys long pressed at the same time force system shut down;after system shut down long press ON/OFF key will let system boot up
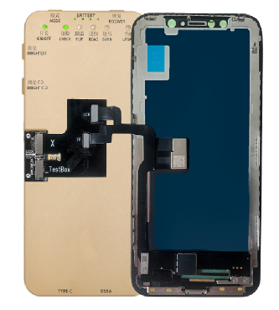
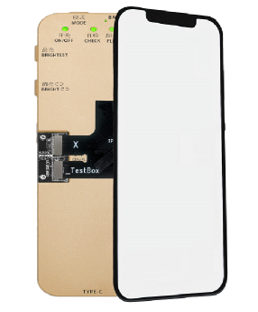
Display connected to iTestBox introduction
Charge introduction
Battery capacity show
Number of always green battery capacity indicator lights shows battery capacity; red light means low battery, need battery charge operation as soon as possible; full battery capacity supports more than 4 hours usage;
Battery charge
Support fast charge, please use the officially provided adapter and data line for safe; please connect data line to TYPE-C interface for charging operation; battery capacity indicator lights flashing means charging; if charging operation done battery capacity indicator lights will stop flashing and always green; number of always green battery capacity indicator lights when data line not connected to iTestBox shows real battery capacity; iTestBox can still be used when charging; full fast charging operation needs about one hour;
iTestBox on and off operation
1.1、ON and OFF operation
1. ON operation: long press ON/OFF key to boot up iTestBox without data line connected, all indicator lights will be from flashing to off state at boot up process, battery capacity lights will be always green when boot up done; at boot up process ON/OFF light will be flashing if FPC connected to iTestBox,the light flashing means system loading the FPC related type display test software or config file, if boot up process finished the ON/OFF light will stop flashing and play warning tone
2. OFF operation: long press ON/OFF key to shut down iTestBox without data line connected, battery capacity lights will be off after shut down process finished; if no data line connected to iTestBox and display off, iTestBox will shut down automatically after five minutes
Note: iTestBox can’t be shut down with data line connected; ON operation only boots up iTestBox, but not lets it enter display on state
Display show function test
1.1 preparation
1.1、display on operation
After iTestBox boot up, connect the FPC matched with the display to iTestBox DISPLAY interface, then connect the FPC with the display, then click ON/OFF key to let display on. if self check error self check indicator light wil be red, if display on operation error the ON/OFF indicator light will be red and play warning tone.
Note: first time display on operation needs some time for software loading, please don’t touch display when display on operation to avoid disturbing self check result and touch test function
1.2、adjust brightness
Adjust display brightness by clicking BRIGHT key, five level brightness control supported; click BRIGHTEST key switches the display to brightest state
1.3、display off operation
Two display off operations:①two fingers click display bottom(convenient mothod);②click ON/OFF key when display on; ON/OFF and self check indicator lights will be off when display off
1.4、switch shown photos
Touch movement from right to left at display bottom lets photo paged up, same as UP key click; touch movement from left to right at display bottom lets photo paged down, same as DOWN key click;
UP+DOWN keys long pressed at the same time can show photos automatically or manually;
Note: at touch simple test mode, touch movement from left to right at display bottom can’t switch shown photos
1.5、config shown photos
Long press DOWN key will let current shown photo not to be shown; long press UP key will let all photos to be shown
Display touch and 3D touch functions test
1.1, enter touch and 3D touch test window
Enter the touch and 3D touch test window using “UP or DOWN key” or touch movement at display bottom
1.2, multiple IOS versions for compatiblity test
Switch IOS versions by MODE key click, IOS version information(IOS version(current IOS version serial number, total IOS number)) displayed at the window top;11 series original displays have encryption chip, if no encryption chip on display IOS version will be “00.0.0”
1.3, touch test modes
Two touch test modes: simple mode and touch track mode. Simple mode is designed for factory mass manufacture, anticlockwise touch movement at display borders will show green bar, anywhere touch postion will show cross, so user can easily find the touch problem; at touch track mode, border touch green bar not shown, but touch track wil be shown by drawing line, touch track mode more free and professional, the lines drawn can be cleared using RECOVER click; long press MODE key switchs simple mode and touch track mode at touch and 3D touch test window
1.4, 3D Touch test
The window will show small red block and large green block according to finger pressure value at display anywhere position, block size changed with pressure value from small to large.
3D touch test for XsMax, XS, X, 8Plus, 8, 7Plus, 7, 6SP and 6S displays only.
1.5, change test background
BRIGHTEST key long press will switch to brightest background, BRIGHT key long press switchs background looply
Display touch and 3D touch functions test: simple mode
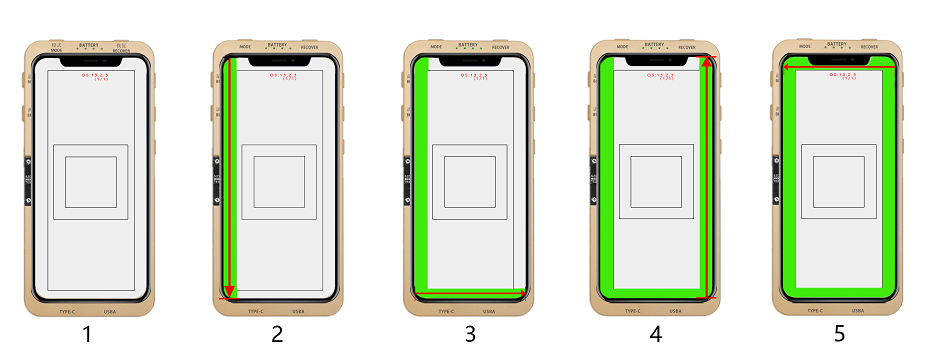
(1), simple mode for touch test;
(2)(3)(4)(5), touch movement according to red arrow indication; Note: touch movement start and end positions should at the arrow edges for full positions test;
(5), full loop green bars means touch test passed, not full loop or position cross not stable means touch failed
Display touch and 3D touch functions test: touch track mode
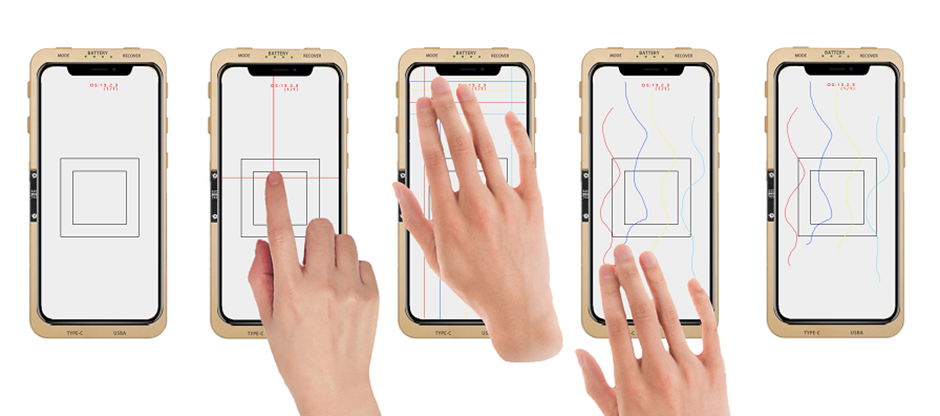
(1), touch track mode, long press MODE key switches simple mode and touch track mode;
(2)(3), touch movement will let window draw movement line and cross; cross accurate and stable means position touch passed; if full screen movement lines accurate and stable and continuous touch function passed(two layers touch sensor can be tested by vertical and horizontal drawn lines, but one layer touch sensor needs full position touch test);
(4)(5), touch movement lines drawn, users convenietnly observe multiple touch support and easily find out touch problems such as no touch, wrong report, not stable and not accurate;
RECOVER key click clears lines drawn;
Display touch and 3D touch functions test: 3D touch test

3D Touch test window: finger touchs display, pressure value grows from small to large(from small red block to large green block);
Large green block appeared means 3D Touch passed;
Display cover let display on or off function test
1.display connected to iTestBox , let display open from iTestBox, the FLIP indicator light should be off
2.then let display close to iTestBox, the FLIP indicator light should be green, green FLIP light means test passed
Note: the test only for IX display
Recover original color show
Recover with original display
1.Boot up iTestBox, connet original display touch cable with iTestBox(let iTestBox at display off state and only connect touch cable);
2.Long press RECOVER key, READ indicator light flashing and iTestBox reading data from original display, after READ light always green then take off original display;
3.Connect the display to be recovered, click RECOVER key, BURN indicator light flashing and burning data to display; BURN light always green means successful recovery, red light means failed.
Recover without original display using USB flash disk
1.Using “沙漏助手” software read cover code from iPhone, refer to later introduction;
2.Store cover code to file itestbox_mtsn_code.txt, then copy file to USB flash disk;
3.Boot up iTestBox, connect display touch cable with iTestBox(only connect touch cable and let display off);
4.Connect USB flash disk to iTestBox, READ light always green means successful data read; click RECOVER key and BURN light flashing and burning data to display; BURN light always green means successful recovery, red light means failed.
Recover without origin display using computer
1.Using “沙漏助手” software read cover code from iPhone, refer to later introduction;
2.Store cover code to file itestbox_mtsn_code.txt;
3.Connect iTestBox to computer, then computer will find a USB disk created by iTestBox, then copy file to USB disk, shut down iTestBox(data line can’t connected to iTestBox at shut down process);
4.Connect display touch cable with iTestBox; boot up iTestBox, READ light flashing means data reading, READ light always green means successful cover code read; click RECOVER key, BURN light flashing means data burning; BURN light always green means successful recovery, red light means failed.
Read the cover code using software named “沙漏助手”
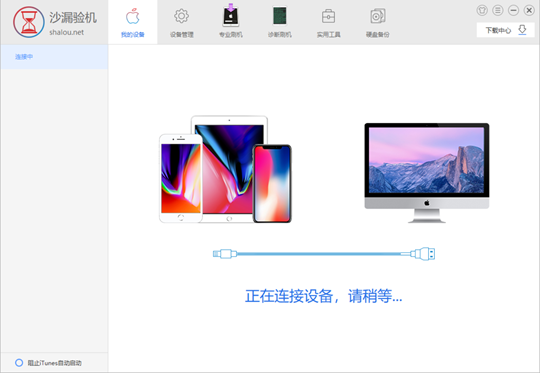
1. Connect booted up iPhone to computer using data line;
Launch “沙漏验机助手” at computer, and software show iPhone connected information;
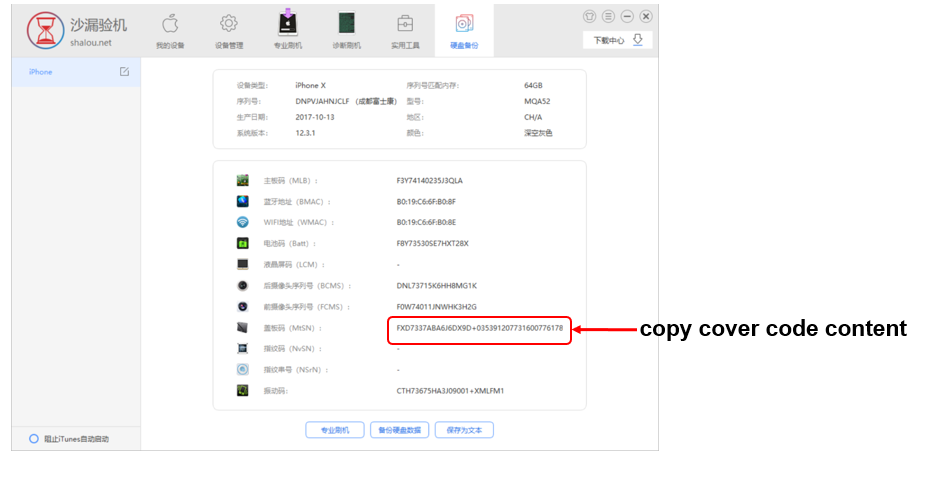
2. Click “硬盘备份”button;
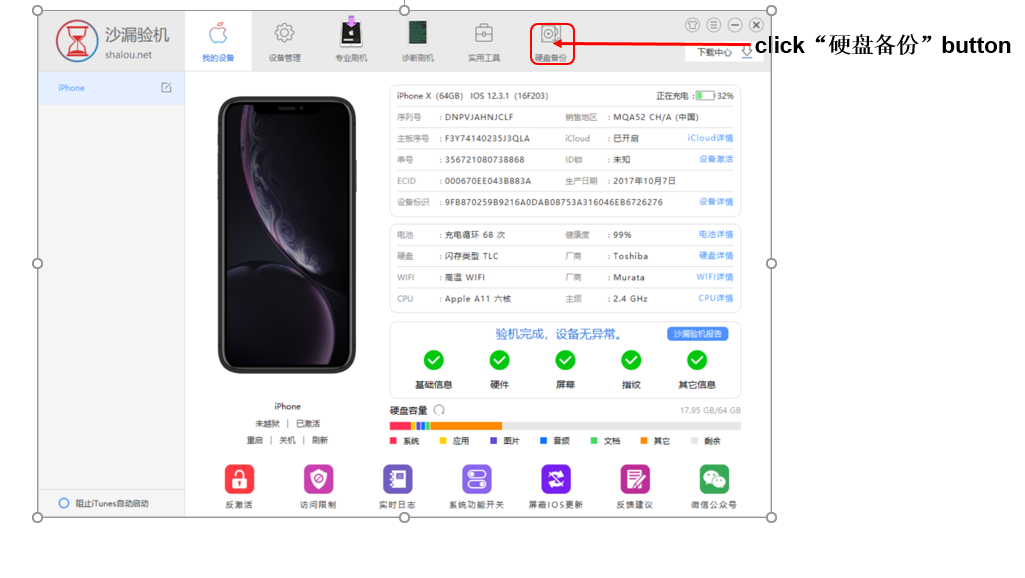
3. After enter into “硬件备份”window, copy cover code content;
iTestBox system software update
Update content
Latest software, user defined photos for display show and new added type displays support(new added type displays need new matched cables and permission files, please contact salesperson);
user defined photos name format: img_horizontalResolution_verticalResolution_serial number.bmp, such as img_1125_2436_1.bmp;
Get iTestBox serial number
method one:
1.connect booted up iTestBox to computer, computer will find USB flash disk;
2.open itestbox_sn_code.txt file at USB flash disk, get serial number from file;
method two:
1.boot up iTestBox;
2.connect USB flash disk to iTestBox;
3.iTestBox plays warning tone after serial number stored to USB flash disk;
4.open itestbox_sn_code.txt at USB flash disk using computer and get serial number from file;
Get update content
Follow official webchat, get update files according to instructions;
Get New added type displays permission files
1.get iTestBox serial number;
2.contact after-sales and provide serial number, get new permission file from after-sales; if existed permission file valid this operation not needed.
Update from USB flash disk
1. please get an empty Usb disk ready, format it with FAT32.
2. extract the update file, then copy the extracted files into the root of Usb disk.
3. turn off the testbox, plug into Usb disk
4. long press the “ON/OFF” key and “BRIGHTEST” key , until the UPDATE light start twinkling, which means update starts
5. plug in the charge line
6. wait for a while, it may take 5 minutes to 20 minutes according to update files, until the testbox beeps “Di” one time, and the UPDATE light stays in GREEN, and no RED light shows.
The update finished.
Update using computer
1. connect iTestBox to computer with the charge line, later computer will find USB flash disk;
2. copy extracted files and permission file(not needed if no update) to root directory of USB disk;
3. disconnect iTestBox from computer, then shut down iTestBox;
4. ON/OFF+BRIGHTEST KEYES to let iTestBox enter update mode(UPDATE light yellow color or flashing);
5. wait for a while, it may take 5 minutes to 20 minutes according to update files, until the testbox beeps “Di” one time, and the UPDATE light stays in GREEN, and no RED light shows. The update finished.
Update user defined photos from USB flash disk
1. make matched resolution BMP photos(name format is img_horizontal resolution_vertical resolution_serial number.bmp, such as img_1125_2436_1.bmp), copy photos to root directory of USB disk;
2. shut down iTestBox; then connect USB disk to iTestBox;
3. long press ON/OFF+BRIGHTEST KEYES to let iTestBox enter update mode
4. UPDATE light stays in GREEN, means successful update, red UPDATE light means failed update;
Update user defined photos using computer
1. make matched resolution JPEG photos(name format is img_horizontal resolution_vertical resolution_serial number.bmp, such as img_1125_2436_1.bmp) at computer
2. connect iTestBox to computer, later computer will find USB flash disk; copy photos to root directory of USB disk;
3. disconnect iTestBox from computer, then shut down iTestBox;
4. ON/OFF+BRIGHTEST KEYES to let iTestBox enter update mode
5. UPDATE light stays in GREEN, means successful update, red UPDATE light means failed update;